
Product images are for informational purposes only and may vary slightly depending on the batch and supplier. Product specifications and prices may be subject to change without notice. We do our best to provide accurate and complete product specifications, but they may not be completely accurate. If you encounter any such situation, please let us know.
The product is intended for specialists and requires qualified and authorized personnel. The product does not include assembly/use instructions . Putting the product into operation by unqualified persons leads to the loss of the warranty according to the Terms and Conditions on the site.
The specified technical parameters (current, power, etc.) represent maximum allowable values under ideal operating conditions. For safe use and optimal lifespan, it is recommended to operate the product continuously at no more than 50% of the specified maximum values.
MP3 amplifier module
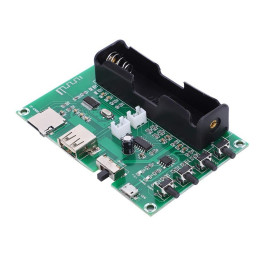
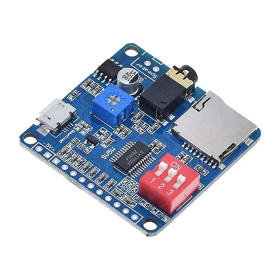
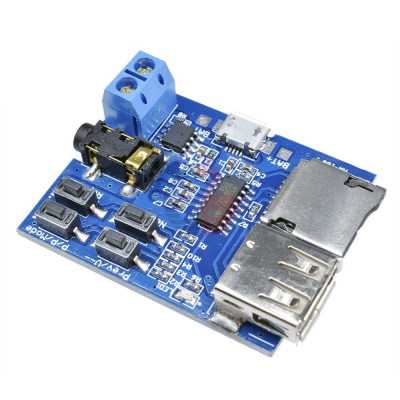
Standalone MP3 player that plays files from a MicroSD card or USB stick directly to a speaker, without programming. The 2 W mono amplifier with screw terminal supports a 4 Ohm speaker, and the 3.5 mm jack provides headphone output. Four buttons control track, volume, source and repeat. Powered at 5 V via MicroUSB or from a Li-Ion battery.
Buying this product earns you 0.54 RON in loyalty points.

International fast shipping within EU. Free Shipping for orders above 100 EUR in most EU countries.

We ship from our stock within 24H

You earn points with every order, worth 5%.
The MP3 playback module with integrated amplifier is a standalone audio player that reads MP3 files from a MicroSD (TF) card or a USB stick and plays them directly through a speaker or headphones. The board combines the MP3 decoder, the audio amplifier and the power supply on a single PCB, without requiring programming. It is suitable for music boxes, custom doorbells, acoustic signaling, audio guides, interactive toys and small announcement systems.
The integrated amplifier has a power of 2 W and a single channel (mono), and the recommended speaker is 3 W and 4 Ohms. The board accepts a supply in the range 3.7 - 5.5 VDC, and playback starts automatically when power is connected. At startup, the module selects the TF card by default, and if no card is present, it switches to the USB stick. When both media are inserted, the source can be switched manually with the P/P/Mode button.
The main features include the MicroSD card slot, the USB-A port for a stick, the two-position screw terminal for the speaker, the gold-plated 3.5 mm jack for headphones or an external amplifier, four tactile buttons (Prev/V--, Next/V++, P/P/Mode and Repeat) and the LED1 indicator that shows the module status. Power is supplied at 5 VDC through the MicroUSB port or from a 3.7 VDC Li-Ion battery connected to the BAT+ and BAT- pads.
Specifications:
Supply voltage: 3.7 - 5.5 VDC (MicroUSB 5 VDC or BAT+ / BAT- pins 3.7 VDC)
Type: MP3 decoder module with integrated audio amplifier
Amplifier power: 2 W
Channels: 1, mono
Recommended speakers: 3 W, 4 Ohms
Media support: MicroSD card (TF) and USB stick
Tested capacity: MicroSD card 16 GB, USB stick 32 GB
Supported audio format: MP3
Default mode at startup: TF card, and if no card is present, USB stick
Audio output: 3.5 mm gold-plated jack and 2-position screw terminal
MicroUSB port: 5 VDC supply
Battery connection: BAT+ and BAT- pins
Control buttons: 4
Indicator: LED1
Dimensions: 45 x 36 mm
Layout:
| Element | Function |
|---|---|
| MicroUSB port | Power input at 5 VDC. The port is used only for power, the module is not controlled through it. |
| BAT+ and BAT- pads | Connection of a 3.7 VDC Li-Ion battery. BAT+ is the positive terminal, and BAT- is the common ground. |
| 2-position screw terminal | Output for a passive speaker. Terminal 1 is the positive terminal, and terminal 2 is the negative terminal. |
| 3.5 mm jack | Audio output for headphones or for an external amplifier. |
| Amplifier circuit | 2 W mono amplifier that drives the speaker connected to the screw terminal. |
| MP3 decoder circuit | Reads the MP3 files from the selected medium and converts them into an audio signal. |
| MicroSD (TF) card slot | Insertion of the card with MP3 files. It is the default source at startup. |
| USB-A port | Connection of a USB stick with MP3 files. It is used automatically if no card is inserted in the slot. |
| Prev / V-- button | Short press: goes to the previous track. Long press, about 2 seconds: decreases the volume. |
| Next / V++ button | Short press: goes to the next track. Long press, about 2 seconds: increases the volume. |
| P / P / Mode button | Short press: starts or stops playback (Play / Pause). Long press, about 2 seconds: switches between USB stick and TF card. |
| Repeat button | Short press: toggles between repeating the current track and repeating the entire list. At startup, repeating the entire list is active. |
| LED1 | Red status LED. It stays on continuously when the module is powered but not playing, and it blinks during playback. |
Pinout:
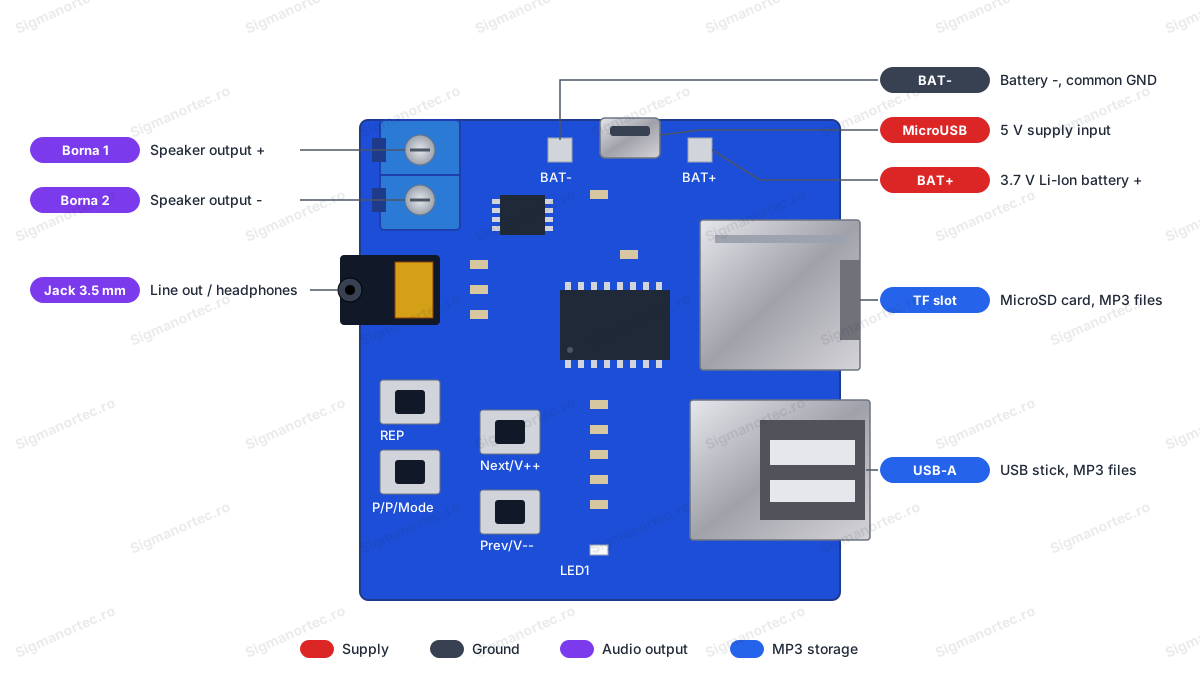
| Connector | Pin | Function |
|---|---|---|
| Battery pads | BAT+ | Positive terminal for the 3.7 VDC Li-Ion battery |
| Battery pads | BAT- | Negative terminal of the battery, common ground |
| MicroUSB | - | 5 VDC supply |
| Screw terminal | Terminal 1 | Speaker output, positive terminal |
| Screw terminal | Terminal 2 | Speaker output, negative terminal |
| 3.5 mm jack | - | Line level or headphone output |
| TF slot | - | MicroSD card with MP3 files |
| USB-A | - | USB stick with MP3 files |
Usage:
Copy the MP3 files to a MicroSD card formatted as FAT32 or to a USB stick, preferably in the root directory of the storage medium.
Insert the card into the TF slot or connect the USB stick to the USB-A port of the module.
Connect a 4 Ohm speaker to the screw terminal, the positive wire to terminal 1 and the negative wire to terminal 2, or connect headphones or an external amplifier to the 3.5 mm jack.
Power the board at 5 VDC through the MicroUSB port or connect a 3.7 VDC Li-Ion battery to the BAT+ and BAT- pads, respecting the polarity.
After power-up, playback starts automatically, and LED1 blinks while the module is playing. If LED1 stays on continuously, playback is stopped or the medium does not contain MP3 files.
Press the P / P / Mode button briefly to stop or resume playback.
Press the Prev / V-- and Next / V++ buttons briefly to change the track, and to adjust the volume hold Next / V++ for about 2 seconds to increase it or Prev / V-- to decrease it.
Press and hold the P / P / Mode button to switch between the USB stick and the TF card when both are inserted.
Press the Repeat button briefly to choose between repeating the current track and repeating the entire list. At every startup, repeating the entire list is active.
For playback from a USB stick, use the 5 VDC supply, because some sticks do not work correctly at 3.7 VDC.
For external control of playback, the button contacts can be pulled to ground through a switch, a transistor or an optocoupler, with a common ground between the module and the control circuit.
- Supply voltage
- 3.7-5.5 V DC
- Dimensions
- 45 x 36 mm
- Type
- MP3 decoder module with integrated audio amplifier
- Connector type
- Micro USB
- Output type
- 3.5 mm jack and screw terminal
- Output power
- 2 W
- Number of channels
- 1, Mono
- Output impedance
- 4 Ω
Produs destinat utilizarii in proiecte electronice, automatizari, prototipare, educatie si cercetare.
Produsul trebuie utilizat numai conform specificatiilor tehnice mentionate in descriere si/sau in documentatia produsului.
Avertismente generale de siguranta:
Nu utilizati produsul la tensiuni, curenti sau temperaturi peste valorile specificate.
Montajul si conectarea trebuie realizate de persoane cu cunostinte tehnice minime in domeniul electric/electronic.
Evitati scurtcircuitele, inversarea polaritatii si conectarea gresita a alimentarii.
Nu lasati produsul alimentat nesupravegheat in timpul testelor.
Produsul nu este jucarie si nu este destinat copiilor.
Pentru modulele electronice, se recomanda utilizarea in carcase, panouri sau montaje protejate, dupa caz.
Identificare produs:
Denumirea produsului, codul/SKU-ul si caracteristicile tehnice sunt mentionate in pagina produsului si/sau pe eticheta ambalajului.
Producator / Importator / Distribuitor:
Sigmanortec S.R.L.
Calea Bucuresti nr. 9, Targu Jiu, Gorj, Romania
E-mail: [email protected]
Website: www.sigmanortec.ro
Persoana responsabila in UE:
Sigmanortec S.R.L.
Calea Bucuresti nr. 9, Targu Jiu, Gorj, Romania
E-mail: [email protected]
Documentatie si siguranta:
Pentru informatii suplimentare, fise tehnice, declaratii de conformitate sau instructiuni, ne puteti contacta la [email protected].
Reviews (6) - Review moderation

Excelent montaj. Citeste instantaneu si card Micro SD Kingston de 16 Gb si USB Kingston de 8 Gb. Am unul de 64 Gb dar n-am avut timp sa pun muzica pe el. Daca-l citeste pe ala ,e prea bun a Am luat doua module ,ambele functioneaza perfect! Tot sa cumperi de pe site-ul Sigmanortec a
Foarte buna la acest pret.
E o jucarie faina!
Ok 10/10
Excelent
This tutorial shows how to power up the MP3 playback module with 2 W amplifier for the first time. The module is standalone: it has its own MP3 decoder and is controlled with the four buttons on the board, so it does not need any development board or any program.
You can use it for a music box, a doorbell with its own melody, an audio guide or an acoustic signal. Copy the MP3 files to a card or a stick, connect a speaker and power the board.
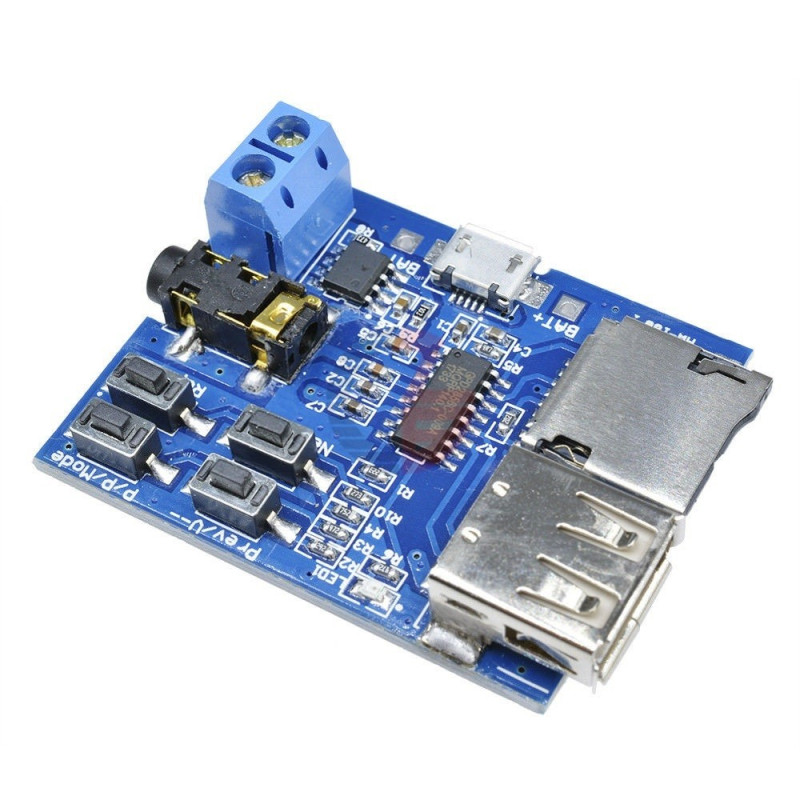
How it works:
At power-up, the MP3 decoder searches for files on the available media. By default it uses the TF card, and if there is no card in the slot, it switches to the USB stick. The MP3 files are converted into an audio signal, which goes to the 2 W mono amplifier and then to the screw terminal for the speaker. The same audio signals are also available at the 3.5 mm jack socket.
For a 4 Ohm speaker, the power of 2 W corresponds to an RMS voltage of about U = square root of (P x R) = square root of (2 x 4), that is approximately 2.8 V, and to a current of I = U / R, that is approximately 0.7 A at maximum volume peaks. For this reason, a 5 V USB adapter rated at 1 - 2 A is useful. A weak adapter may produce distortion or restarts at high volume.
Playback starts automatically when power is connected. LED1 stays lit continuously when the module is powered but not playing, and it blinks during playback. At startup, repeat of the entire list is active.
Connection:
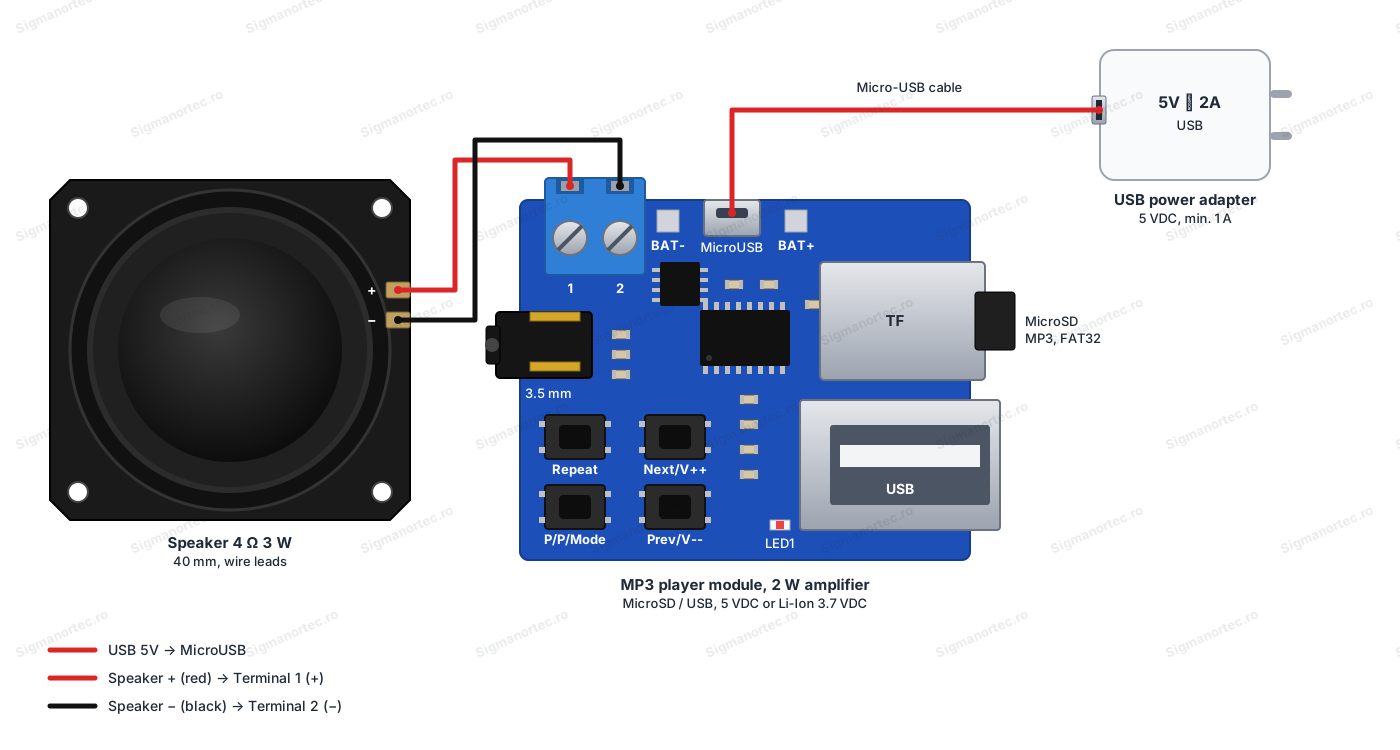
Power the module at 5 VDC from a USB adapter through a Micro-USB cable. The board can also be powered from a 3.7 VDC Li-Ion battery connected to the BAT+ and BAT- pads, but for the USB stick, powering at 5 VDC is recommended. The speaker connects to the screw terminal, with the red wire (+) to terminal 1 and the black wire (-) to terminal 2. The module has no logic pins, so there are no 3.3 V or 5 V levels to adapt.
| Product pin | Connect to | Function |
|---|---|---|
| MicroUSB | USB adapter 5 VDC 2 A, through Micro-USB cable | 5 VDC power supply |
| Terminal 1 (SPK1) | 4 Ohm 3 W speaker, red wire (+) | Speaker output, positive terminal |
| Terminal 2 (SPK2) | 4 Ohm 3 W speaker, black wire (-) | Speaker output, negative terminal |
Buttons, controls and indicators:
| Element | What it does | How to use it |
|---|---|---|
| Prev / V-- | Previous track and lower volume | Short press: previous track. Long press of about 2 seconds: decreases the volume. |
| Next / V++ | Next track and higher volume | Short press: next track. Long press of about 2 seconds: increases the volume. |
| P / P / Mode | Play / Pause and source selection | Short press: stops or resumes playback. Long press of about 2 seconds: switches between USB stick and TF card. |
| Repeat | Repeat mode | Short press: toggles between repeating the current track and repeating the entire list. |
| LED1 | Status indicator | Steady on: module powered, playback stopped. Blinking: playback in progress. |
Volume: start playback, then hold Next / V++ for about 2 seconds to make it louder, or Prev / V-- to make it quieter. The change is heard immediately from the speaker, repeat the press until you reach the desired level.
Changing tracks: a short press on Next / V++ goes to the next track, and one on Prev / V-- goes to the previous track. The change is heard immediately.
Source: when both media are inserted, long press P / P / Mode to switch from the card to the stick or vice versa. The module starts by default on the TF card.
Repeat: at startup, repeat of the entire list is active. Briefly press Repeat to repeat only the current track, and another press returns to repeating the entire list.
Configuration:
| Mode | How to select it | Notes |
|---|---|---|
| Playback from TF card | Default at startup or by long press on P / P / Mode | MicroSD card formatted FAT32, with MP3 files |
| Playback from USB stick | Automatic if there is no card or by long press on P / P / Mode | Power supply recommended at 5 VDC |
| List repeat | Default at startup | All tracks play in a loop |
| Track repeat | Short press on Repeat | The current track plays in a loop |
Step 1: format the card or the stick as FAT32 and copy the MP3 files, preferably to the root directory.
Step 2: insert the medium into the TF slot or the USB-A port, then connect the speaker and the power supply.
Step 3: check that LED1 blinks and that music is heard, then adjust the volume with long presses on Next / V++ or Prev / V--.
After each restart the module returns to the default mode: TF card source (or the stick if there is no card) and repeat of the entire list.
Usage example:
The goal is a music box that plays the songs from a card in a loop. Copy the MP3 files to a MicroSD card formatted as FAT32 and insert it into the TF slot.
Connect a 4 Ohm, 3 W speaker: the red wire to terminal 1 and the black wire to terminal 2. Power the board from a 5 V USB adapter rated at 1 - 2 A through a Micro-USB cable.
Playback starts automatically and LED1 blinks. Hold Next / V++ until the volume is suitable. Keep the default repeat to play all tracks in a loop, or press Repeat once if you want to repeat a single song.
Common problems:
No sound at all: check that the speaker is connected to the screw terminal (the wire strands firmly clamped in the terminal) and that the files are in MP3 format. Other formats are not played. Also check that LED1 blinks, otherwise playback is stopped or the medium does not contain valid files.
LED1 stays lit continuously: playback is stopped. Briefly press P / P / Mode. If no tracks start, check that the medium is formatted as FAT32 and that the files are copied correctly.
USB stick not recognized: use a 5 VDC power supply, because some sticks do not work correctly at 3.7 VDC. The module has been tested with sticks up to 32 GB and cards up to 16 GB.
The module plays tracks from the card when you want the stick: the card has priority at startup. Long press P / P / Mode to switch to the stick.
The sound is distorted at high volume: use a 3 W, 4 Ohm speaker, an adapter of at least 1 A and reduce the volume with long presses on Prev / V--.
The module does not respond through the USB cable: the MicroUSB port serves only for power supply, control is done with the buttons on the board.
Limitations and tips:
The module plays only MP3 files and has a single amplification channel, with 2 W output, so it is not suitable for stereo playback. For louder sound or stereo, use the jack socket with an external amplifier.
Control is done only with the buttons on the board, and there is no direct selection of a specific track. For external control, the button contacts can be pulled to ground through a switch, a transistor or an optocoupler, with a common ground.
For stable results, use short speaker wires, a stable 5 V power supply and a good quality card. You can go further and build music boxes, doorbells or sound announcements triggered by an external contact.