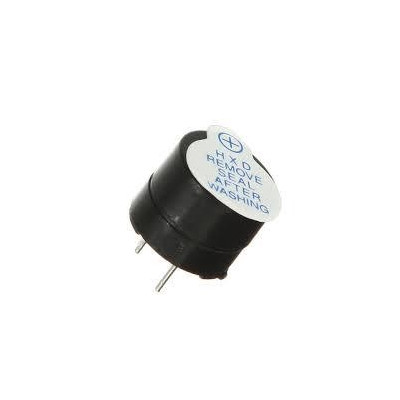

Product images are for informational purposes only and may vary slightly depending on the batch and supplier. Product specifications and prices may be subject to change without notice. We do our best to provide accurate and complete product specifications, but they may not be completely accurate. If you encounter any such situation, please let us know.
The product is intended for specialists and requires qualified and authorized personnel. The product does not include assembly/use instructions . Putting the product into operation by unqualified persons leads to the loss of the warranty according to the Terms and Conditions on the site.
The specified technical parameters (current, power, etc.) represent maximum allowable values under ideal operating conditions. For safe use and optimal lifespan, it is recommended to operate the product continuously at no more than 50% of the specified maximum values.
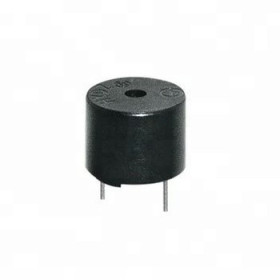
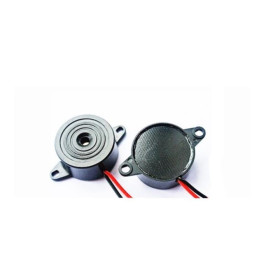
Active buzzer, 5V, 12 mm diameter, 85 dB
Active buzzer for quick audible signalling in electronic projects, it emits sound immediately when DC voltage is applied, operates at 5VDC, does not require a PWM signal or a complex driver, integrates easily into circuits with microcontrollers and 5V supplies, ideal for alarms, confirmations and sound notifications.
Buying this product earns you 0.19 RON in loyalty points.

International fast shipping within EU. Free Shipping for orders above 100 EUR in most EU countries.

We ship from our stock within 24H

You earn points with every order, worth 5%.
The 5 V active buzzer with a diameter of 12 mm is an electromagnetic acoustic transducer with an integrated oscillator, which emits a fixed tone as soon as it receives DC voltage, without an external frequency signal. It is suitable for simple audible signals, such as button press confirmation, alarms, threshold exceeded warnings, doorbells and status signals in electronic devices.
The oscillator inside the housing produces the tone at approximately 2.4 kHz, with a sound level of at least 85 dB at 10 cm. The rated operating voltage is 5 VDC, and the maximum current consumption is 30 mA. The sound starts when the voltage is applied and stops when it is interrupted, so the beep rhythm is set by the duration of the power supply and of the pause.
The main features include the black housing with a diameter of 12 mm, the two pins for through-hole soldering, the sealing label marked with + for polarity and the sound hole located under the label. Power is supplied at 5 VDC, respecting the polarity, with the long pin being the positive one.
It can be driven directly from a 5 V digital output of an Arduino board for short tests. For long-term operation, the 30 mA current exceeds the recommended value for a microcontroller pin, and the buzzer should be driven through an NPN transistor.
Specifications:
Supply voltage: 5 VDC
Current consumption: maximum 30 mA
Type: Active buzzer, with integrated oscillator
Technology: Electromagnetic
Tone frequency: Approximately 2.4 kHz, fixed
Sound level: Minimum 85 dB at 10 cm
Mounting: Through-hole soldering, 2 pins
Dimensions: 12 x 9.5 mm
Layout:
| Element | Function |
|---|---|
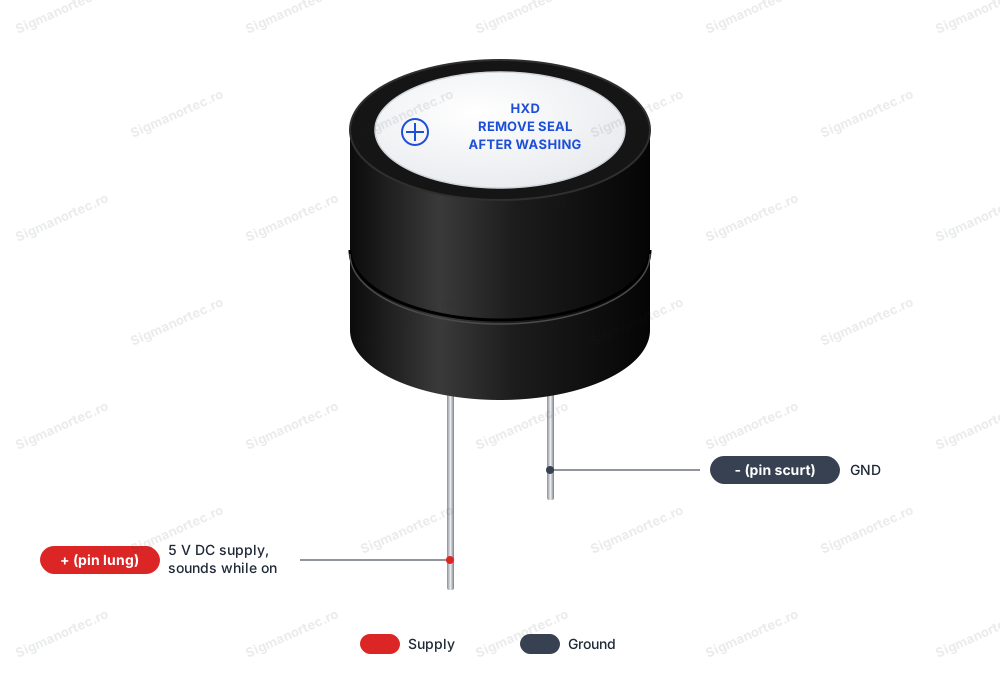
| Long pin (+) | The positive pin, to which 5 VDC is applied for the buzzer to emit sound. It is marked with the + sign also on the label above. |
| Short pin (-) | The negative pin, connected to ground (GND). |
| Sealing label | Covers the sound hole and protects the buzzer during soldering and washing. After soldering and washing it can be peeled off, and the buzzer sounds louder without it. |
| Housing with sound hole | The 12 mm housing that contains the oscillator and the diaphragm. The sound comes out through the hole under the label. |
Pinout:
| Connector | Pin | Function |
|---|---|---|
| Buzzer terminals | + (long pin) | 5 VDC supply, the sound is active as long as the voltage is applied |
| Buzzer terminals | - (short pin) | GND |
Usage:
Identify the positive pin, which is the long one and is marked with the + sign on the label above.
Solder the buzzer into holes or connect it with wires, with the + pin to the 5 VDC source or to the control output and the - pin to ground.
Respect the polarity, because a buzzer connected in reverse does not emit any sound.
Do not apply alternating voltage and do not exceed the rated voltage of 5 VDC.
Power the buzzer and check its operation: the sound is heard immediately, and it stops when the voltage is interrupted.
For control from a 5 V digital output of an Arduino board, connect the + pin to the output and the - pin to GND, then set the output to HIGH for sound and to LOW for silence. The tone() function is not necessary.
For long-term operation, drive the buzzer through an NPN transistor, for example 2N2222 or BC547, with a 1 kohm resistor at the base, because the 30 mA consumption exceeds the recommended value for a microcontroller pin.
Peel off the sealing label after soldering and washing, for a louder sound.
Mount the buzzer so that the sound hole is not blocked by the housing or by wires.
- tension
- AD
- Input Voltage
- 5 V
Produs destinat utilizarii in proiecte electronice, automatizari, prototipare, educatie si cercetare.
Produsul trebuie utilizat numai conform specificatiilor tehnice mentionate in descriere si/sau in documentatia produsului.
Avertismente generale de siguranta:
Nu utilizati produsul la tensiuni, curenti sau temperaturi peste valorile specificate.
Montajul si conectarea trebuie realizate de persoane cu cunostinte tehnice minime in domeniul electric/electronic.
Evitati scurtcircuitele, inversarea polaritatii si conectarea gresita a alimentarii.
Nu lasati produsul alimentat nesupravegheat in timpul testelor.
Produsul nu este jucarie si nu este destinat copiilor.
Pentru modulele electronice, se recomanda utilizarea in carcase, panouri sau montaje protejate, dupa caz.
Identificare produs:
Denumirea produsului, codul/SKU-ul si caracteristicile tehnice sunt mentionate in pagina produsului si/sau pe eticheta ambalajului.
Producator / Importator / Distribuitor:
Sigmanortec S.R.L.
Calea Bucuresti nr. 9, Targu Jiu, Gorj, Romania
E-mail: [email protected]
Website: www.sigmanortec.ro
Persoana responsabila in UE:
Sigmanortec S.R.L.
Calea Bucuresti nr. 9, Targu Jiu, Gorj, Romania
E-mail: [email protected]
Documentatie si siguranta:
Pentru informatii suplimentare, fise tehnice, declaratii de conformitate sau instructiuni, ne puteti contacta la [email protected].
Reviews (10) - Review moderation

E bun.
Excelente
preturi bune,servicii excelente,timp de livrare f.scurt.
Va multumesc pentru promtitudine si va doresc un An Nou cu Sanatate si impliniri
Excelent
/*
  Active buzzer 5 V, 12 mm - simple test

  Board: Arduino Uno (Tools > Board > Arduino AVR Boards > Arduino Uno)
  Libraries: none needed

  Wiring:
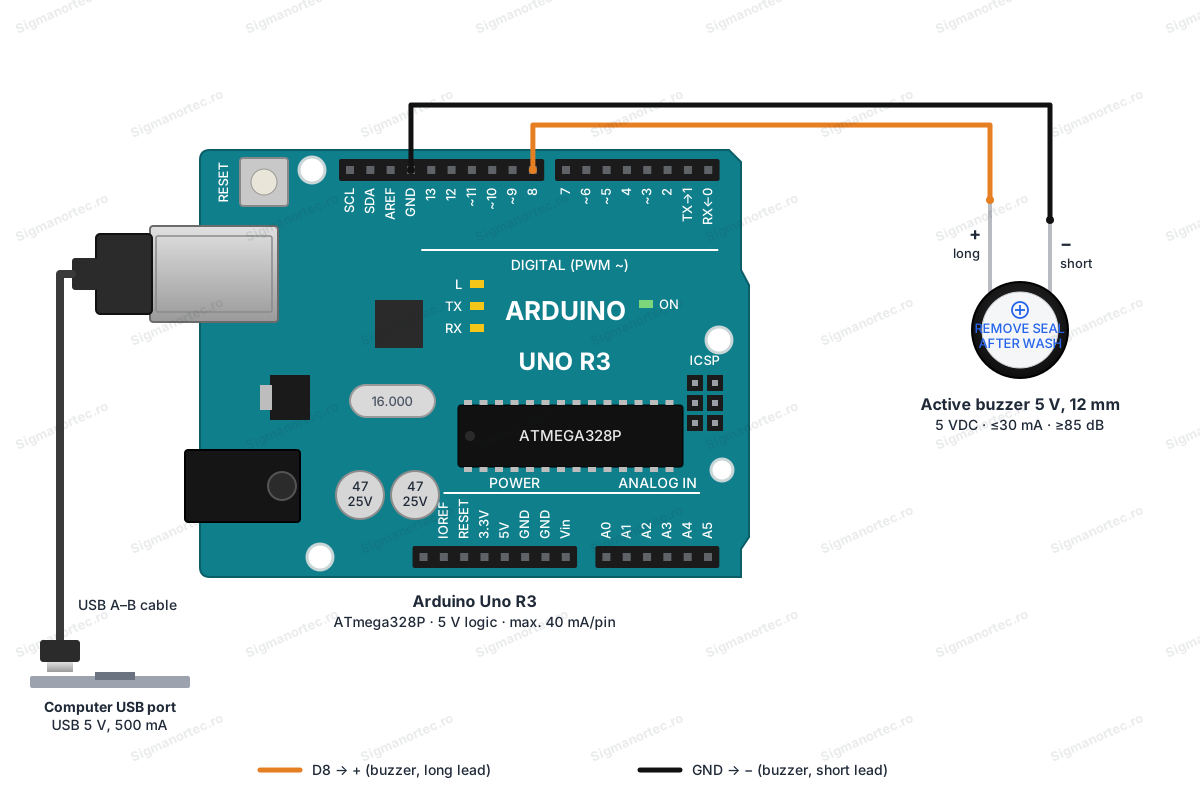
    Buzzer + (long lead, marked with +) -> Arduino D8
    Buzzer - (short lead)               -> Arduino GND (digital header, next to AREF)

  Note: the buzzer is active, it has a built-in oscillator and sounds at a fixed
  tone whenever DC is applied. tone() is not needed.
*/

const int BUZZER_PIN = 8;   // Digital pin connected to the buzzer +

void setup() {
  pinMode(BUZZER_PIN, OUTPUT);     // Buzzer pin as output
  digitalWrite(BUZZER_PIN, LOW);   // Start silent
  Serial.begin(9600);              // Serial monitor at 9600 baud
  Serial.println("Buzzer test started");
}

void loop() {
  Serial.println("Buzzer ON");
  digitalWrite(BUZZER_PIN, HIGH);  // Sound on
  delay(500);

  Serial.println("Buzzer OFF");
  digitalWrite(BUZZER_PIN, LOW);   // Sound off
  delay(1000);
}
This tutorial uses the Arduino Uno R3 board, powered from the computer via the USB cable. The 5 V active buzzer with a 12 mm diameter has a small oscillator inside its housing, so it emits a fixed tone on its own when DC voltage is applied.
Use it in projects for audible signals, for example confirming a button press, alarms, warnings when a threshold is exceeded, or doorbells.
How it works:
A passive buzzer is only a transducer. It needs an alternating signal from the microcontroller, and the pitch of the sound depends on the frequency of that signal. The active buzzer has an additional oscillator circuit, so for sound you apply 5 V continuously, and when the voltage is removed the sound stops. The tone has a fixed frequency of approximately 2.3 - 2.4 kHz, and the volume is at least 85 dB at 10 cm.
For this reason, the program controls the buzzer with digitalWrite(8, HIGH) for sound and digitalWrite(8, LOW) for silence. The tone() function is not necessary and does not change the pitch. The rhythm of the beeps is set by the duration the pin stays HIGH and LOW.
The rated consumption is a maximum of 30 mA at 5 V. A pin of the ATmega328P microcontroller on the Arduino Uno supports a maximum of 40 mA, and the recommended value is 20 mA. Connected directly, the buzzer is below the absolute limit but above the recommended value. For short tests, a direct connection is suitable.
For long-term operation or when you are not sure, drive the buzzer through an NPN transistor, for example 2N2222 or BC547, with a 1 kohm resistor at the base.
Wiring:
Power the Arduino Uno R3 board from the computer via the USB cable. The buzzer receives its 5 V directly from pin D8, which operates at a 5 V logic level, so you do not need a level converter. Respect the polarity, because a buzzer connected in reverse does not make any sound. The positive pin is the longer one and is marked with a + sign on the label on top.
| Product pin | Connect to | Role |
|---|---|---|
| + (the long pin, marked with + on the label) | Arduino Uno D8 | Control signal and power, 5 V at HIGH |
| - (the short pin) | Arduino Uno GND (the one on the digital header, next to AREF) | Ground |
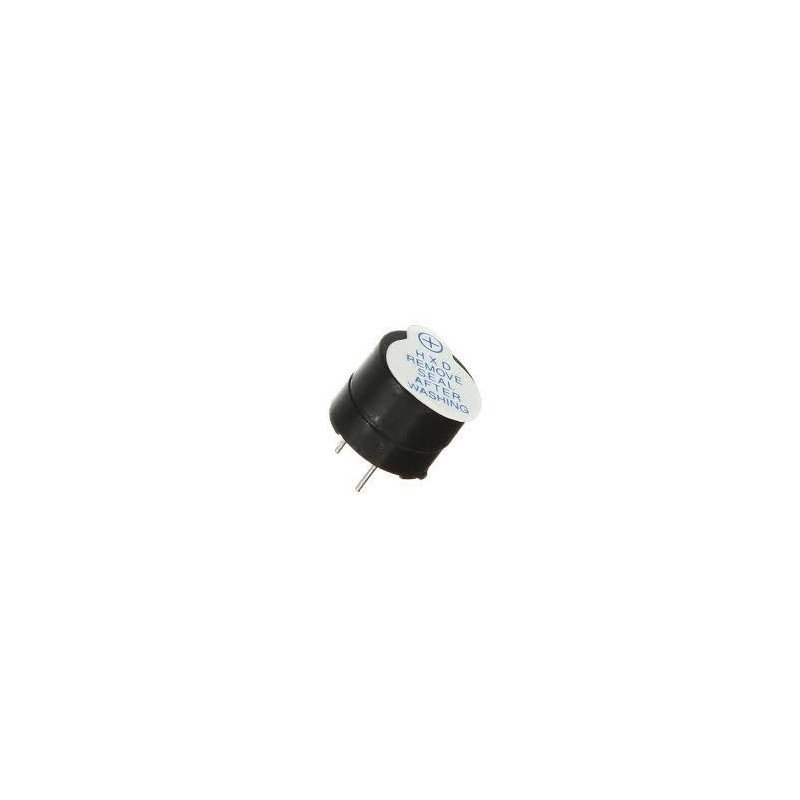
If the buzzer has the label with the text REMOVE SEAL AFTER WASHING stuck on its top face, you can peel it off after soldering or washing, because the buzzer sounds louder without it.
Board and libraries:
In the Arduino IDE, select the Arduino Uno board at Tools > Board, from the Arduino AVR Boards package, which comes installed with the Arduino IDE. If you do not have it, add it from the Boards Manager. At Tools > Port, choose the COM or tty port of the board. The program does not use any library, so none needs to be installed.
Code:
The program below makes the buzzer emit short beeps, then a longer pause, and prints each step on the serial monitor.
/*
  Active buzzer 5 V, 12 mm - beep test
  Board: Arduino Uno (Tools > Board > Arduino AVR Boards > Arduino Uno)
  Libraries: none needed
  Wiring:
    Buzzer + (long lead, marked with +) -> Arduino D8
    Buzzer - (short lead)               -> Arduino GND (digital header, next to AREF)
*/
const int BUZZER_PIN = 8;                   // Digital pin that drives the buzzer
const unsigned long BEEP_MS = 200;          // Duration of one beep in milliseconds
const unsigned long PAUSE_MS = 300;         // Pause between beeps in milliseconds
const unsigned long LONG_PAUSE_MS = 1500;   // Longer pause after a group of beeps
int beepCount = 0;                          // Number of beeps emitted so far
void setup() {
  pinMode(BUZZER_PIN, OUTPUT);              // Set the buzzer pin as output
  digitalWrite(BUZZER_PIN, LOW);            // Make sure the buzzer is silent at start
  Serial.begin(9600);                       // Start the serial monitor at 9600 baud
  Serial.println("Active buzzer test started");
}
void loop() {
  beepCount++;                              // Count this beep
  digitalWrite(BUZZER_PIN, HIGH);           // Apply 5 V: the built-in oscillator makes the sound
  Serial.print("Beep ");
  Serial.print(beepCount);
  Serial.println(" ON");
  delay(BEEP_MS);                           // Keep the buzzer on for the beep duration
  digitalWrite(BUZZER_PIN, LOW);            // Remove the voltage: the buzzer goes silent
  Serial.print("Beep ");
  Serial.print(beepCount);
  Serial.println(" OFF");
  if (beepCount % 3 == 0) {
    delay(LONG_PAUSE_MS);                   // Longer pause after every third beep
  } else {
    delay(PAUSE_MS);                        // Short pause between beeps
  }
}
How the code works:
The constant BUZZER_PIN has the value 8 and indicates the pin to which the + pin of the buzzer is connected. The constants BEEP_MS, PAUSE_MS and LONG_PAUSE_MS set the duration of a beep, the pause between beeps and the longer pause after a group of beeps, in milliseconds. The variable beepCount counts the beeps emitted.
In the setup() function, pin 8 is configured as an output with pinMode(), then it is set to LOW so that the buzzer does not sound at startup. Also here, the serial port is opened at 9600 baud and a start message is displayed.
In the loop() function, the program sets the pin to HIGH, waits BEEP_MS, then sets it to LOW. At each beep, beepCount increases and a message is printed. After every group of three beeps there is a longer pause, and after the other beeps a short pause, so that you can clearly distinguish the rhythm.
Result:
Open the Serial Monitor in the Arduino IDE and set the speed to 9600 baud. With each message of the type Beep ON you hear a short beep, and at Beep OFF the buzzer is silent. Example output:
Active buzzer test started
Beep 1 ON
Beep 1 OFF
Beep 2 ON
Beep 2 OFF
Beep 3 ON
Beep 3 OFF
Beep 4 ON
Beep 4 OFF
Beep 5 ON
Beep 5 OFF
Common problems:
The buzzer does not make any sound. The most frequent cause is reversed polarity or a loose contact. Check that the long pin, marked with +, goes to D8 and the short pin goes to GND. Also check that the wires are well inserted into the connectors.
The buzzer sounds continuously, even after uploading the program. If the + pin is mistakenly connected to 5 V instead of D8, the buzzer receives voltage permanently. Move the wire to D8 and check that the program was uploaded.
The sound is weak or muffled. The label on the top face covers the sound opening. Peel it off after soldering and washing. Also mount the buzzer so that the opening is not blocked by the housing or by a wire.
The board resets or the pin heats up during long operation. The buzzer consumes up to 30 mA, above the recommended value of 20 mA for a pin of the ATmega328P. Drive the buzzer through an NPN transistor, for example 2N2222 or BC547, with a 1 kohm resistor at the base, with the emitter to GND, the collector to the - pin of the buzzer and the + pin to 5 V.
No messages appear on the serial monitor. Check that the speed in the Serial Monitor is 9600 baud and that the board's port is selected at Tools > Port.
Limitations and tips:
The active buzzer emits a single fixed tone, of approximately 2.3 - 2.4 kHz. For melodies or different tones, you need a passive buzzer, driven with tone().
The rated voltage is 5 V DC, and AC voltage must not be applied. Change the rhythm of the beeps through the durations BEEP_MS, PAUSE_MS and LONG_PAUSE_MS.
You can further build an alarm that sounds when a value read by a sensor exceeds a threshold, or an audible confirmation signal when a button is pressed. In this case, use the NPN transistor for long-term operation.