Product images are for informational purposes only and may vary slightly depending on the batch and supplier. Product specifications and prices may be subject to change without notice. We do our best to provide accurate and complete product specifications, but they may not be completely accurate. If you encounter any such situation, please let us know.
The product is intended for specialists and requires qualified and authorized personnel. The product does not include assembly/use instructions . Putting the product into operation by unqualified persons leads to the loss of the warranty according to the Terms and Conditions on the site.
The specified technical parameters (current, power, etc.) represent maximum allowable values under ideal operating conditions. For safe use and optimal lifespan, it is recommended to operate the product continuously at no more than 50% of the specified maximum values.
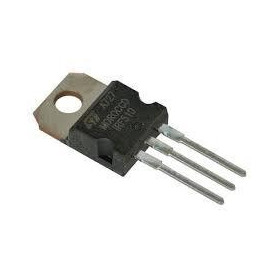
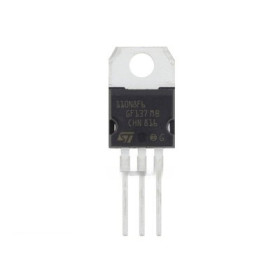
MOSFET STP55NF06 P55NF06, N-channel, 60V, 50A, TO-220
N-channel power MOSFET for fast switching in switching power supplies, motor drivers and automotive applications, supports 60V and up to 50A, with low Rds(on) for small losses and better efficiency, TO-220 package for easy mounting and efficient heat dissipation, suitable for safe control of inductive and resistive loads.
Shipping by Wednesday 11 November
Buying this product earns you 0.29 RON in loyalty points.

International fast shipping within EU. Free Shipping for orders above 100 EUR in most EU countries.

We ship from our stock within 24H

You earn points with every order, worth 5%.
The STP55NF06 MOSFET (marking P55NF06) is an N-channel power transistor made with STMicroelectronics' STripFET II technology, in a TO-220 package. It switches DC loads of up to 50 A at voltages of up to 60 V and is suitable for DC-DC converters, switching power supplies, DC motor control, LED strips, solenoid valves, relays and other switching applications, including with PWM signal for power adjustment.
The on-resistance RDS(on) is 0.015 ohms typical and 0.018 ohms maximum at VGS = 10 V and ID = 27.5 A, which keeps losses low even at high currents. The threshold voltage VGS(th) is between 2 and 4 V, and to fully open the channel 10 V is applied between gate and source. The pulsed drain current reaches 200 A, and the total power dissipation is 110 W at a case temperature of 25 °C. The input capacitance is 1300 pF typical, so the gate is easily driven by a driver or by a logic signal of sufficient level.
Main features include the three-terminal TO-220 package (Gate, Drain, Source), the metal tab electrically connected to Drain, provided with a mounting hole for a heatsink, internal diode between source and drain, 100% avalanche tested and high capability to withstand rapid voltage changes dv/dt. The maximum permissible voltage between gate and source is ± 20 V. The component has no power supply of its own and is controlled by voltage on the gate, the gate drawing current only while charging and discharging the input capacitance.
Specifications:
Drain-source voltage (VDS): 60 V
Continuous drain current (ID): 50 A at TC = 25 °C, 35 A at TC = 100 °C
Pulsed drain current (IDM): 200 A
Type: N-channel power MOSFET, STripFET II
Maximum gate-source voltage (VGS): ± 20 V
Threshold voltage VGS(th): 2 - 4 V (3 V typical) at ID = 250 µA
On-resistance RDS(on): 0.015 ohms typical, 0.018 ohms maximum at VGS = 10 V and ID = 27.5 A
Total power dissipation (Ptot): 110 W at TC = 25 °C
Input capacitance (Ciss): 1300 pF typical
Total gate charge (Qg): 44.5 nC typical
Thermal resistance junction-to-case: maximum 1.36 °C/W
Thermal resistance junction-to-ambient: maximum 62.5 °C/W
Storage and junction operating temperature: from -55 to 175 °C
Package: TO-220
Marking: P55NF06
Dimensions: 10.4 x 15.75 x 4.6 mm
Pinout:
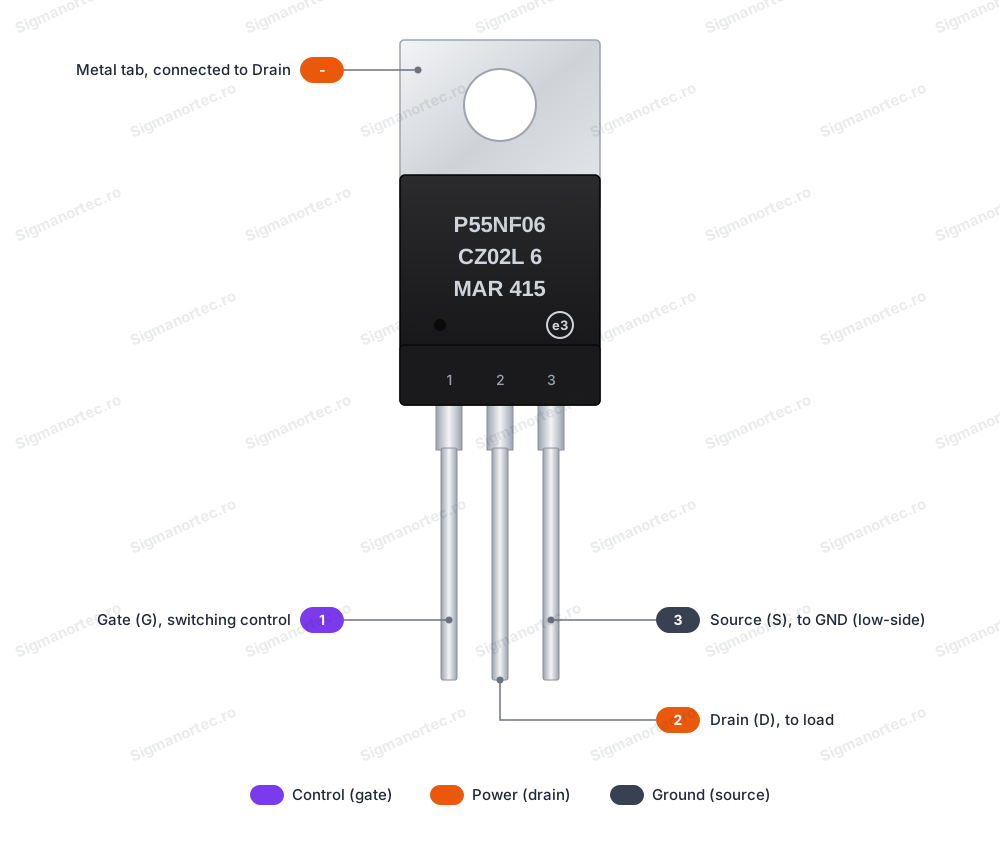
| Connector | Pin | Function |
|---|---|---|
| TO-220 | 1 | Gate (G), control gate |
| TO-220 | 2 | Drain (D), drain, connects to the load |
| TO-220 | 3 | Source (S), source, connects to ground or to the negative supply in the low-side circuit |
| Metal tab | - | Electrically connected to Drain (D) |
Usage:
Identify the terminals with the marked side of the transistor facing you and the terminals pointing down, from left to right: 1 = Gate, 2 = Drain, 3 = Source.
Mount the transistor in the load circuit, with Drain towards the load and Source towards ground, so that it switches the negative side of the load (low-side).
Drive the gate through a series resistor of the order of hundreds of ohms, which limits the charging current of the input capacitance, and mount between gate and Source a resistor of about 10 kohms, which keeps the transistor off when the control signal is absent.
For full conduction and minimum losses apply about 10 V on the gate relative to Source. At control voltages below 10 V the on-resistance is higher, so limit the load current or use a gate driver.
Do not apply more than 20 V between gate and Source and do not leave the gate unconnected, as the component is sensitive to electrostatic discharge.
If the load is inductive (motor, solenoid valve, relay), mount a protection diode in parallel with the load, with the cathode towards the positive supply.
The metal tab is connected to Drain and carries the load voltage, so do not let it touch other metal parts and insulate it from the heatsink with an insulating foil when the heatsink is connected to ground.
Estimate the dissipated power with the formula P = I x I x RDS(on). If the value exceeds about 1 W, mount a heatsink on the metal tab.
For stable results, keep the gate connections short and use wires of sufficient cross-section for the load current.
- Dimensions
- 10.4 x 15.75 x 4.6 mm
- Model
- P55NF06
- Type
- N-channel power MOSFET, STripFET II
- Operating temperature
- -55-175 °C
- Package
- TO-220
Produs destinat utilizarii in proiecte electronice, automatizari, prototipare, educatie si cercetare.
Produsul trebuie utilizat numai conform specificatiilor tehnice mentionate in descriere si/sau in documentatia produsului.
Avertismente generale de siguranta:
Nu utilizati produsul la tensiuni, curenti sau temperaturi peste valorile specificate.
Montajul si conectarea trebuie realizate de persoane cu cunostinte tehnice minime in domeniul electric/electronic.
Evitati scurtcircuitele, inversarea polaritatii si conectarea gresita a alimentarii.
Nu lasati produsul alimentat nesupravegheat in timpul testelor.
Produsul nu este jucarie si nu este destinat copiilor.
Pentru modulele electronice, se recomanda utilizarea in carcase, panouri sau montaje protejate, dupa caz.
Identificare produs:
Denumirea produsului, codul/SKU-ul si caracteristicile tehnice sunt mentionate in pagina produsului si/sau pe eticheta ambalajului.
Producator / Importator / Distribuitor:
Sigmanortec S.R.L.
Calea Bucuresti nr. 9, Targu Jiu, Gorj, Romania
E-mail: [email protected]
Website: www.sigmanortec.ro
Persoana responsabila in UE:
Sigmanortec S.R.L.
Calea Bucuresti nr. 9, Targu Jiu, Gorj, Romania
E-mail: [email protected]
Documentatie si siguranta:
Pentru informatii suplimentare, fise tehnice, declaratii de conformitate sau instructiuni, ne puteti contacta la [email protected].
Reviews (1) - Review moderation

/*
  STP55NF06 (P55NF06) PWM low-side switch test

  Board: Arduino Uno (Tools > Board > Arduino AVR Boards, package "Arduino AVR Boards")
  Libraries: none, the program uses only the core Arduino functions.

  Wiring:
    Arduino D9  -> R1 220 ohm -> MOSFET Gate (pin 1)
    MOSFET Gate (pin 1) -> R2 10 kohm -> Arduino GND (pull-down)
    MOSFET Drain (pin 2) -> LED strip GND (minus)
    MOSFET Source (pin 3) -> minus of the DC jack adapter
    Arduino GND -> minus of the DC jack adapter (common ground)
    Plus of the DC jack adapter (12 VDC, min. 2 A) -> LED strip +12V
  The Arduino is powered from the PC through USB.
*/

const uint8_t GATE_PIN = 9;                  // PWM pin that drives the MOSFET gate through R1
const unsigned long STEP_DELAY_MS = 20;      // Delay between two brightness steps
const unsigned long HOLD_DELAY_MS = 1500;    // Time spent fully on and fully off

// Set the PWM level (0 - 255) and print it every 25 steps
void setLevel(int level) {
  analogWrite(GATE_PIN, level);              // Output the PWM signal to the gate
  if (level % 25 == 0) {
    int percent = (level * 100L) / 255;      // Duty cycle in percent
    Serial.print("Gate level: ");
    Serial.print(level);
    Serial.print(" / 255 (duty ");
    Serial.print(percent);
    Serial.println(" %)");
  }
}

void setup() {
  Serial.begin(9600);                        // Start the serial monitor at 9600 baud
  pinMode(GATE_PIN, OUTPUT);                 // Gate pin is an output
  analogWrite(GATE_PIN, 0);                  // Start with the MOSFET off
  Serial.println("STP55NF06 PWM test started");
}

void loop() {
  Serial.println("Fading up");
  for (int level = 0; level <= 255; level += 5) {   // Ramp up from off to full on
    setLevel(level);
    delay(STEP_DELAY_MS);
  }
  delay(HOLD_DELAY_MS);                      // Stay fully on

  Serial.println("Fading down");
  for (int level = 255; level >= 0; level -= 5) {   // Ramp down from full on to off
    setLevel(level);
    delay(STEP_DELAY_MS);
  }
  delay(HOLD_DELAY_MS);                      // Stay fully off
}
The STP55NF06 MOSFET transistor (marking P55NF06) is an N-channel power transistor in a TO-220 package, for voltages up to 60 V and continuous current up to 50 A. In projects we use it as an electronic switch controlled by a logic signal. It can switch on and off LED strips, small motors, solenoid valves, bulbs or 12 V relays, and if the control signal is PWM, it can also adjust the brightness or the speed.
In this tutorial we use the Arduino Uno R3 board, which provides the PWM signal on pin D9, and we control a 12 V LED strip. The transistor is mounted on the ground side of the load (low-side switch), and the 12 V supply comes from a separate adapter.

How it works:
The MOSFET has three terminals: Gate, Drain and Source. Between Drain and Source the load current flows only when the voltage between Gate and Source (VGS) exceeds the turn-on threshold. The gate does not consume DC current, it only charges and discharges like a small capacitor, so one Arduino pin is enough to control much larger loads.
The VGS(th) threshold of the STP55NF06 is between 2 V and 4 V, with 3 V typical. The on-state resistance RDS(on) is 0.015 ohms typical and 0.018 ohms maximum, but it is guaranteed only for VGS = 10 V. The Arduino Uno outputs 5 V, so the transistor turns on, but not fully. For this reason, in the tutorial we use a modest load of approximately 1.5 A, at which the heating remains negligible. For high currents, the gate is driven at 10 - 12 V through a driver circuit, or a logic-level variant is chosen, for example the STP55NF06L.
The power dissipated in the transistor is estimated with the formula P = I x I x RDS(on). For 1.5 A and 0.018 ohms we get P = 1.5 x 1.5 x 0.018, which is approximately 0.04 W. This is an indicative value, calculated for 10 V on the gate, and at 5 V the real resistance is higher. If the dissipated power exceeds approximately 1 W, add a heatsink.
The 220 ohm resistor in series with the gate limits the charging current of the input capacitance, approximately 1.3 nF (typical Ciss 1300 pF), when pin D9 suddenly goes HIGH. The peak current is at most 5 V / 220 ohms, which is approximately 23 mA, within the pin limits. The time constant is 220 ohms x 1.3 nF, which is approximately 0.29 microseconds, much smaller than the PWM period of approximately 2 ms (the default frequency of pin D9 is approximately 490 Hz). The 10 kohm resistor between gate and GND keeps the transistor off while the Arduino resets or starts up and the pin is still in an undefined state.
The function analogWrite(pin, value) accepts values between 0 and 255. The duty cycle is value / 255, for example 128 means approximately 50 %. The strip receives on average the same fraction of the 12 V voltage, so it lights up proportionally dimmer or brighter.
Connection:
The pins are counted looking at the transistor with the marked face toward you and the terminals pointing down, from left to right: 1 = Gate, 2 = Drain, 3 = Source. The metal tab on the back is electrically connected to Drain, so it carries the load voltage when the load is off. Do not let it touch other metal parts. The Arduino Uno is powered via USB from the computer, and the LED strip is powered by the 12 VDC adapter, minimum 2 A, connected to a 5.5 x 2.1 mm jack adapter with screw terminals. The grounds of the two power supplies must be connected together.
| Product pin | Connects to | Role |
|---|---|---|
| MOSFET Gate (pin 1) | Arduino D9 through the 220 ohm resistor R1 | PWM control signal |
| MOSFET Gate (pin 1) | 10 kohm resistor R2 to Arduino GND | Pull-down, keeps the transistor off at startup |
| MOSFET Drain (pin 2) | LED strip, GND wire (minus) | Ground end of the load, switched by the transistor |
| MOSFET Source (pin 3) | Minus of the jack adapter | Common ground |
| Arduino GND | Minus of the jack adapter | Common ground with the 12 V supply |
| Jack adapter, plus | LED strip, +12V wire | Load supply |
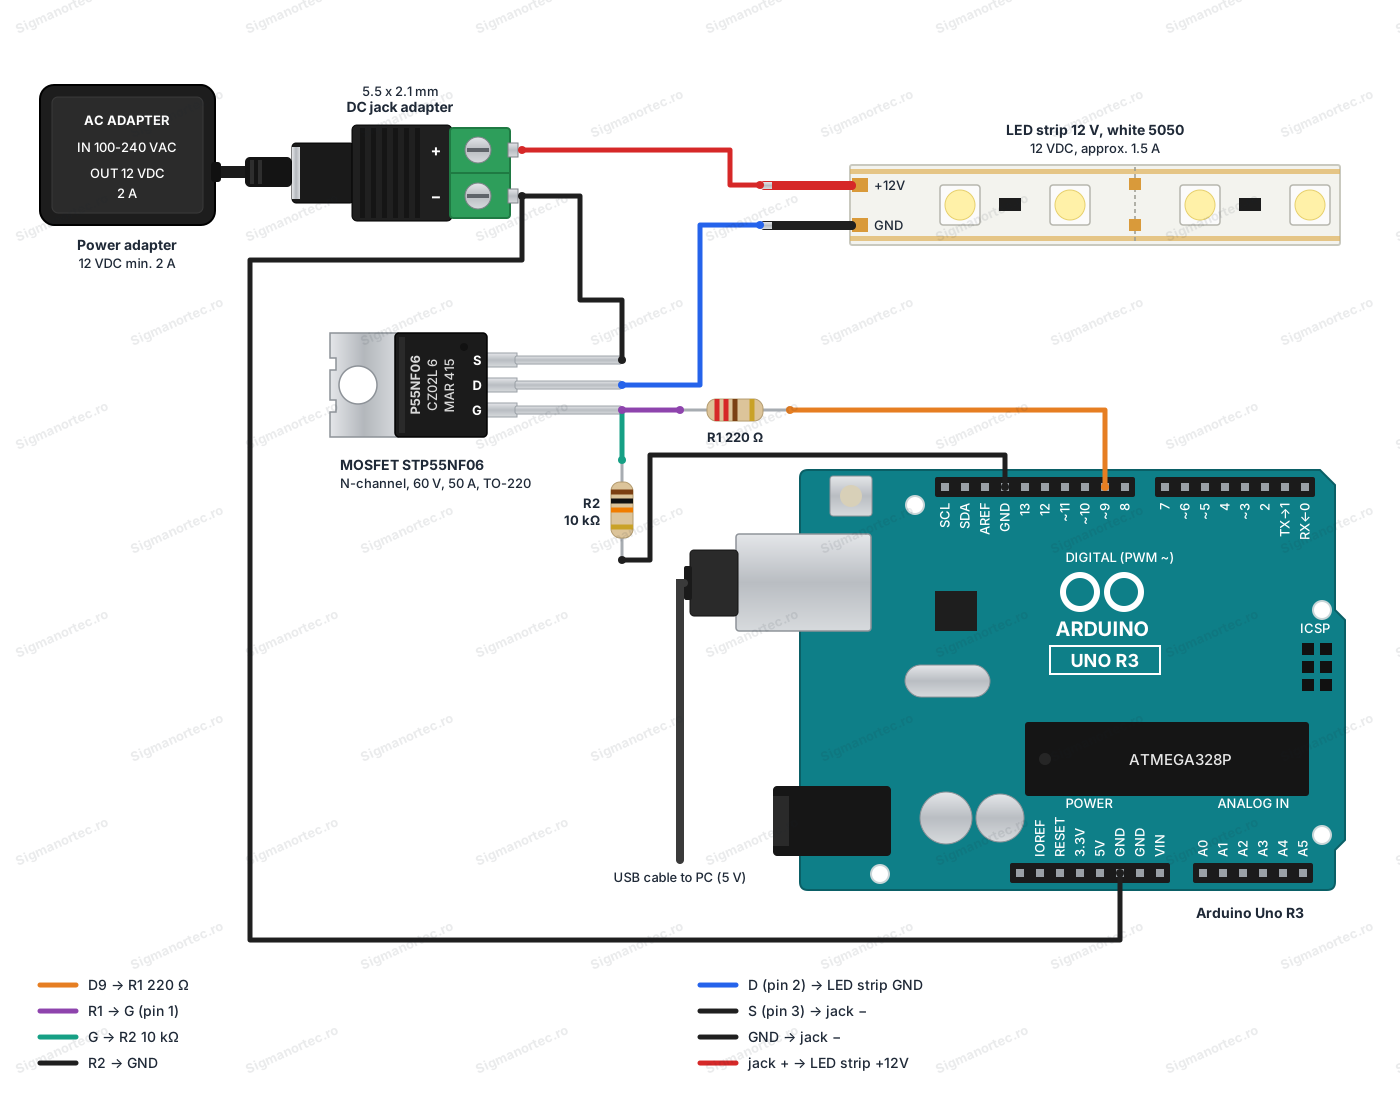
The control voltage is 5 V (Arduino Uno logic), so no level converter is needed. Do not apply more than 20 V to the gate, the absolute maximum value of the transistor. If instead of the LED strip you control an inductive load (motor, solenoid valve, relay), mount a 1N4007 or 1N5819 protection diode in parallel with the load, with the cathode to +12 V.
Board and libraries:
In the Arduino IDE select the Arduino Uno board, from the menu Tools > Board > Arduino AVR Boards. The Arduino AVR Boards package comes with the Arduino IDE, so it does not need to be installed separately. The program uses only the basic Arduino functions, so no library needs to be installed.
The code:
The program gradually increases the PWM duty cycle on pin D9 from 0 to 255, keeps the strip fully lit, then gradually turns it off and repeats the cycle, printing the level on the serial monitor.
/*
  STP55NF06 (P55NF06) PWM low-side switch test
  Board: Arduino Uno (Tools > Board > Arduino AVR Boards, package "Arduino AVR Boards")
  Libraries: none, the program uses only the core Arduino functions.
  Wiring:
    Arduino D9  -> R1 220 ohm -> MOSFET Gate (pin 1)
    MOSFET Gate (pin 1) -> R2 10 kohm -> Arduino GND (pull-down)
    MOSFET Drain (pin 2) -> LED strip GND (minus)
    MOSFET Source (pin 3) -> minus of the DC jack adapter
    Arduino GND -> minus of the DC jack adapter (common ground)
    Plus of the DC jack adapter (12 VDC, min. 2 A) -> LED strip +12V
  The Arduino is powered from the PC through USB.
*/
const uint8_t GATE_PIN = 9;                  // PWM pin that drives the MOSFET gate through R1
const unsigned long STEP_DELAY_MS = 20;      // Delay between two brightness steps
const unsigned long HOLD_DELAY_MS = 1500;    // Time spent fully on and fully off
// Set the PWM level (0 - 255) and print it every 25 steps
void setLevel(int level) {
  analogWrite(GATE_PIN, level);              // Output the PWM signal to the gate
  if (level % 25 == 0) {
    int percent = (level * 100L) / 255;      // Duty cycle in percent
    Serial.print("Gate level: ");
    Serial.print(level);
    Serial.print(" / 255 (duty ");
    Serial.print(percent);
    Serial.println(" %)");
  }
}
void setup() {
  Serial.begin(9600);                        // Start the serial monitor at 9600 baud
  pinMode(GATE_PIN, OUTPUT);                 // Gate pin is an output
  analogWrite(GATE_PIN, 0);                  // Start with the MOSFET off
  Serial.println("STP55NF06 PWM test started");
}
void loop() {
  Serial.println("Fading up");
  for (int level = 0; level <= 255; level += 5) {   // Ramp up from off to full on
    setLevel(level);
    delay(STEP_DELAY_MS);
  }
  delay(HOLD_DELAY_MS);                      // Stay fully on
  Serial.println("Fading down");
  for (int level = 255; level >= 0; level -= 5) {   // Ramp down from full on to off
    setLevel(level);
    delay(STEP_DELAY_MS);
  }
  delay(HOLD_DELAY_MS);                      // Stay fully off
}
How the code works:
At the beginning we define the constant GATE_PIN with the value 9, the PWM pin that controls the gate through R1. The constants STEP_DELAY_MS (20 ms) and HOLD_DELAY_MS (1500 ms) set the speed at which the brightness changes and how long the strip stays fully on or fully off.
The function setLevel(level) writes the PWM value to the pin with analogWrite and, at every multiple of 25, calculates the duty cycle in percent (level * 100L) / 255 and prints it on the serial monitor.
In setup() we start serial communication at 9600 baud, configure GATE_PIN as output and set it to 0, so that the transistor starts off. In loop() a for loop increases level from 0 to 255 with a step of 5, waits HOLD_DELAY_MS, then a second for loop decreases it from 255 to 0 and waits HOLD_DELAY_MS again.
Result:
Open the serial monitor at 9600 baud. The LED strip should light up gradually, stay fully lit for 1.5 seconds, then fade out gradually, and the messages below appear on the monitor.
STP55NF06 PWM test started
Fading up
Gate level: 0 / 255 (duty 0 %)
Gate level: 25 / 255 (duty 9 %)
Gate level: 50 / 255 (duty 19 %)
Gate level: 75 / 255 (duty 29 %)
Gate level: 100 / 255 (duty 39 %)
Gate level: 125 / 255 (duty 49 %)
Gate level: 150 / 255 (duty 58 %)
Gate level: 175 / 255 (duty 68 %)
Gate level: 200 / 255 (duty 78 %)
Gate level: 225 / 255 (duty 88 %)
Common issues:
The strip does not light up at all. The usual cause is the wrong pin order. Check that Gate is pin 1, Drain is pin 2 and Source is pin 3, looking at the transistor with the marked face toward you and the terminals pointing down, and that the 12 V adapter is connected.
The strip is dim even at the value 255. At 5 V on the gate the transistor is not fully on, and its resistance is higher than the 0.018 ohm value given for 10 V. Check that the load does not exceed approximately 1.5 A, and for high loads use a gate driver at 10 - 12 V or a logic-level variant.
The strip stays on at startup or flickers when the board resets. The 10 kohm resistor R2 between gate and GND is missing or has a poor contact. Check it.
Nothing works even though the connections look correct. The Arduino ground is not connected to the minus of the 12 V adapter. Without a common ground, the gate signal has no reference to Source.
The transistor heats up. The load is too large for the 5 V drive, or a heatsink is missing. Reduce the current or mount a heatsink on the metal tab.
Nothing appears on the serial monitor. Check the 9600 baud speed and the port selected in Tools > Port.
Limitations and tips:
The STP55NF06 is not a logic-level MOSFET. The values of 60 V and 50 A are maximum limits, and at 5 V control you practically work with much smaller loads. The maximum voltage between gate and Source is 20 V, and the real current also depends on cooling, because the junction-to-ambient thermal resistance is 62.5 °C/W without a heatsink.
The default PWM frequency of pin D9 is approximately 490 Hz, suitable for LED strips and small motors. For a more powerful setup, use a gate driver powered at 10 - 12 V, and with inductive loads always mount a protection diode. On the same circuit you can control a DC motor, a solenoid valve or a 12 V bulb.