
Product images are for informational purposes only and may vary slightly depending on the batch and supplier. Product specifications and prices may be subject to change without notice. We do our best to provide accurate and complete product specifications, but they may not be completely accurate. If you encounter any such situation, please let us know.
The product is intended for specialists and requires qualified and authorized personnel. The product does not include assembly/use instructions . Putting the product into operation by unqualified persons leads to the loss of the warranty according to the Terms and Conditions on the site.
The specified technical parameters (current, power, etc.) represent maximum allowable values under ideal operating conditions. For safe use and optimal lifespan, it is recommended to operate the product continuously at no more than 50% of the specified maximum values.
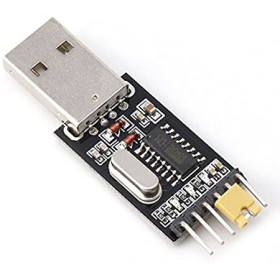
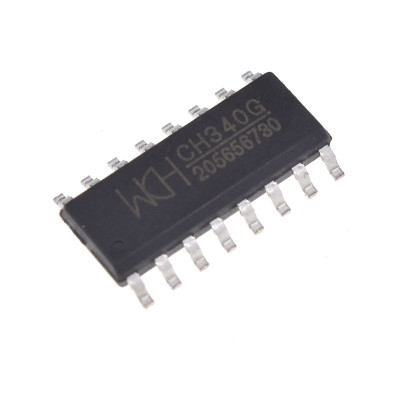
CH340G IC, USB to UART converter, SOP-16, 3.3V or 5V, up to 2 Mbps
USB to Serial converter ideal for microcontroller projects and UART modules, providing stable communication between PC and serial devices, compatible with TTL UART interfaces, easy installation with common drivers, SOP-16 package with 16 pins for compact PCB mounting, low power consumption and reliable operation in electronic applications.
Buying this product earns you 0.35 RON in loyalty points.

International fast shipping within EU. Free Shipping for orders above 100 EUR in most EU countries.

We ship from our stock within 24H

You earn points with every order, worth 5%.
The CH340G IC is a USB to serial converter produced by WCH, which turns a computer's USB port into a TTL UART port and makes it visible in the system as a virtual serial port. It is suitable for USB-TTL adapters, for programming and debugging boards with a serial interface, for connecting equipment with a classic serial port to USB and, by adding a level conversion circuit, for RS232, RS485 or RS422 interfaces.

The chip is a full-speed USB device compatible with USB 2.0, with an integrated USB transceiver and pull-up resistors, which is why the UD+ and UD- lines connect directly to the USB connector, without series resistors. The serial part is full-duplex, with transmit and receive buffers, and supports speeds from 50 bps up to 2 Mbps, with 5, 6, 7 or 8 data bits, 1 or 2 stop bits and parity check. Besides TXD and RXD, the IC offers the MODEM signals RTS, DTR, DCD, RI, DSR and CTS. The 12 MHz clock is obtained with an external crystal connected between pins XI and XO.
Main features include the SOP-16 package with 1.27 mm pitch, an integrated power-on reset circuit, automatic USB device suspend for low consumption, the auxiliary pin R232, which inverts the RXD input when set high, and standard serial port emulation under Windows. The IC works at 5 V or 3.3 V. At 5 V the VCC pin is supplied, and the V3 pin receives a 0.1 uF capacitor to ground. At 3.3 V the V3 pin is connected to the VCC pin.
Through the UART interface, the IC can be used to connect the computer to Arduino, ESP32, STM32 and other boards with a serial port. At a 5 V supply the outputs are at 5 V level, suitable for Arduino Uno, and at 3.3 V the levels are 3.3 V, suitable for ESP32 or STM32.
Specifications:
Supply voltage: 4.0 - 5.3 VDC (5 V mode) or 2.9 - 3.6 VDC (3.3 V mode, V3 connected to VCC)
Current consumption: maximum 20 mA at 5 V and maximum 12 mA at 3.3 V in operation, maximum 0.2 mA in USB suspend
Manufacturer: WCH
Circuit type: USB to UART converter
USB interface: Full-speed, USB 2.0 compatible
Serial interface: full-duplex TTL UART
Communication speed: 50 bps - 2 Mbps
Data format: 5, 6, 7 or 8 data bits, 1 or 2 stop bits, even, odd, mark or space parity
MODEM signals: RTS, DTR, DCD, RI, DSR, CTS
Clock: external 12 MHz crystal with two 33 pF capacitors
High input logic level: minimum 2.3 V at 5 V and minimum 1.9 V at 3.3 V
Operating temperature: -40 - 85 °C
Package: SOP-16, 16 pins
Pin pitch: 1.27 mm
Body width: 3.9 mm
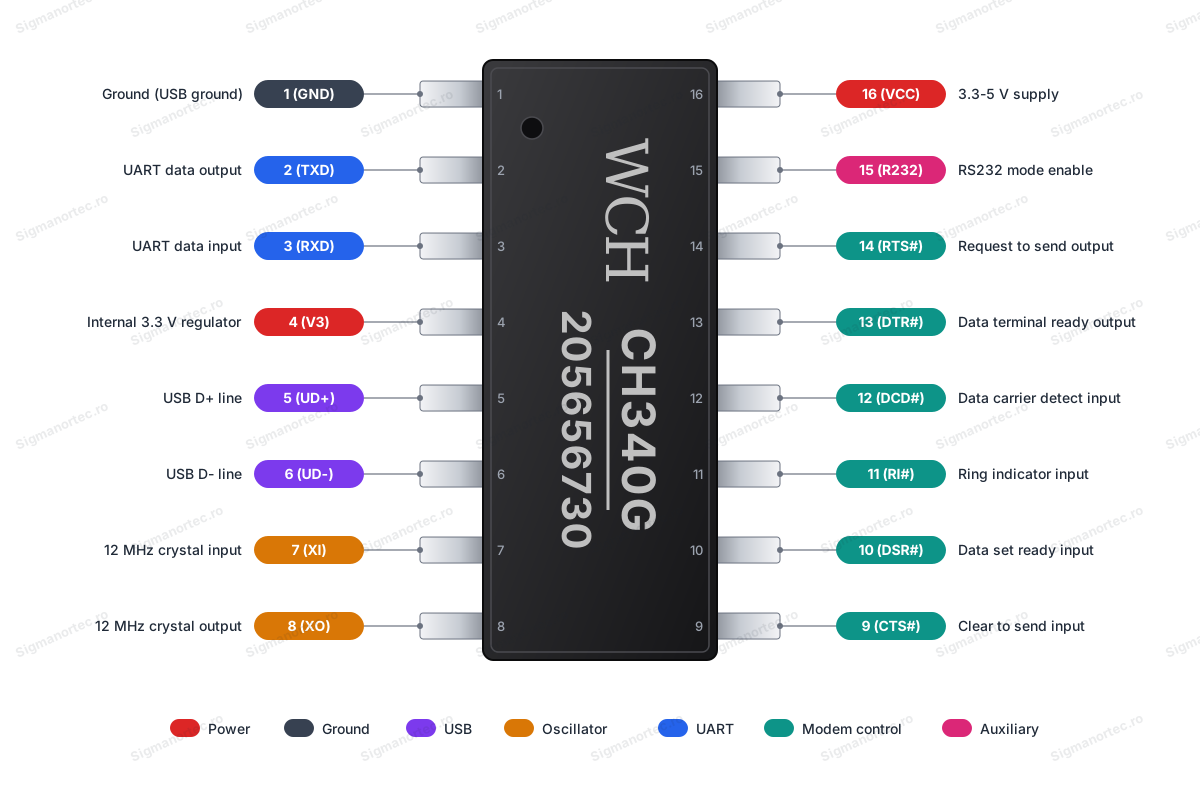
Pinout:
| Connector | Pin | Function |
|---|---|---|
| Power | 1 (GND) | Common ground, connected directly to the USB bus ground. |
| Power | 16 (VCC) | Power input 5 V or 3.3 V, with 0.1 uF decoupling capacitor. |
| Power | 4 (V3) | At 5 V it is connected to ground through a 0.1 uF capacitor. At 3.3 V it is connected to VCC. |
| USB | 5 (UD+) | USB bus D+ line, connected directly, without series resistor. |
| USB | 6 (UD-) | USB bus D- line, connected directly, without series resistor. |
| Oscillator | 7 (XI) | Oscillator input, for 12 MHz crystal and capacitor to ground. |
| Oscillator | 8 (XO) | Oscillator output, for 12 MHz crystal and capacitor to ground. |
| UART | 2 (TXD) | Serial data output, connect to RX of the external device. |
| UART | 3 (RXD) | Serial data input, connect to TX of the external device. |
| MODEM | 9 (CTS#) | MODEM input clear to send, active low. |
| MODEM | 10 (DSR#) | MODEM input data set ready, active low. |
| MODEM | 11 (RI#) | MODEM input ring indicator, active low. |
| MODEM | 12 (DCD#) | MODEM input data carrier detect, active low. |
| MODEM | 13 (DTR#) | MODEM output data terminal ready, active low. |
| MODEM | 14 (RTS#) | MODEM output request to send, active low. |
| Auxiliary | 15 (R232) | Enables the auxiliary RS232 function at high level, when the RXD input is inverted. Has internal pull-down. |
| Supply mode | VCC pin | V3 pin |
|---|---|---|
| 5 V | 5 V (4.0 - 5.3 V), with 0.1 uF to ground | 0.1 uF capacitor to ground, not connected to VCC |
| 3.3 V | 3.3 V (2.9 - 3.6 V) | Directly connected to VCC |
Usage:
Mount the IC on a PCB with a SOP-16 footprint, or on a SOP-16 to DIP adapter if you want to use it on a breadboard. Pin 1 is located next to the dot marking on the package.
For 5 V supply, connect pin 16 (VCC) to the 5 V line of the USB connector, with a 0.1 uF capacitor to ground, and connect pin 4 (V3) to ground through another 0.1 uF capacitor. Do not connect the V3 pin to VCC in this mode.
For 3.3 V supply, connect pin 4 (V3) directly to pin 16 (VCC) and supply both pins from a 3.3 V source. The circuits connected to the IC must not apply voltages higher than 3.3 V to the pins.
Connect a 12 MHz crystal between pins 7 (XI) and 8 (XO), and a 33 pF ceramic capacitor from each pin to ground. If you use a ceramic resonator instead of a quartz crystal, use the capacitor values recommended by its manufacturer, usually 47 pF. Without the oscillator the IC does not start and the serial port does not appear.
Connect pins 5 (UD+) and 6 (UD-) directly to the D+ and D- lines of the USB connector, without series resistors, and the connector ground to pin 1 (GND).
Connect pin 2 (TXD) to the RX input of the external device and pin 3 (RXD) to its TX output, with a common ground between the two circuits. Leave the unused MODEM pins and the R232 pin unconnected.
Do not exceed 6 V on the VCC pin and do not apply voltages higher than VCC + 0.5 V to the signal pins, as the IC may be damaged.
Connect the USB cable to the computer. If the operating system does not recognize the device, install the VCP driver for CH340 from WCH. After installation a new serial port appears, for example COM5 on Windows or /dev/ttyUSB0 on Linux, and it is opened with a terminal program at the speed set in the external device.
For stable results, mount the decoupling capacitors and the crystal as close as possible to the IC pins, use short traces for UD+ and UD-, and short connections for the serial signals.
- Supply voltage
- 4.0-5.3 V DC (mod 5 V) sau 2.9-3.6 V DC (mod 3.3 V)
- Type
- USB to UART converter
- Operating temperature
- -40-85 °C
- Number of pins
- 16
- Interface
- USB 2.0 full-speed, UART TTL
- Power consumption
- maxim 20 mA la 5 V, maxim 12 mA la 3.3 V
- Width
- 3.9 mm
- Integrated circuit
- CH340G
- Manufacturer
- WCH
- Pin pitch
- 1.27 mm
- Package
- SOP-16
Produs destinat utilizarii in proiecte electronice, automatizari, prototipare, educatie si cercetare.
Produsul trebuie utilizat numai conform specificatiilor tehnice mentionate in descriere si/sau in documentatia produsului.
Avertismente generale de siguranta:
Nu utilizati produsul la tensiuni, curenti sau temperaturi peste valorile specificate.
Montajul si conectarea trebuie realizate de persoane cu cunostinte tehnice minime in domeniul electric/electronic.
Evitati scurtcircuitele, inversarea polaritatii si conectarea gresita a alimentarii.
Nu lasati produsul alimentat nesupravegheat in timpul testelor.
Produsul nu este jucarie si nu este destinat copiilor.
Pentru modulele electronice, se recomanda utilizarea in carcase, panouri sau montaje protejate, dupa caz.
Identificare produs:
Denumirea produsului, codul/SKU-ul si caracteristicile tehnice sunt mentionate in pagina produsului si/sau pe eticheta ambalajului.
Producator / Importator / Distribuitor:
Sigmanortec S.R.L.
Calea Bucuresti nr. 9, Targu Jiu, Gorj, Romania
E-mail: [email protected]
Website: www.sigmanortec.ro
Persoana responsabila in UE:
Sigmanortec S.R.L.
Calea Bucuresti nr. 9, Targu Jiu, Gorj, Romania
E-mail: [email protected]
Documentatie si siguranta:
Pentru informatii suplimentare, fise tehnice, declaratii de conformitate sau instructiuni, ne puteti contacta la [email protected].
Reviews (2) - Review moderation

Funcsioneaza an parametrii normali
foarte bun, pret foarte bun
/*
  CH340G USB to UART bridge test
  Board: Arduino Uno (Tools > Board > Arduino AVR Boards > Arduino Uno), package Arduino AVR Boards
  Libraries: SoftwareSerial (included with Arduino IDE, nothing to install)

  Wiring:
    CH340G pin 2 (TXD) -> Arduino Uno pin 10 (software RX)
    CH340G pin 3 (RXD) -> Arduino Uno pin 11 (software TX)
    CH340G pin 1 (GND) -> Arduino Uno GND
  The CH340G circuit is powered at 5 V from its own USB connector, with a 12 MHz crystal
  between pins 7 and 8, 33 pF capacitors to ground and 0.1 uF capacitors on pins 4 and 16.
  Open the serial port created by the CH340G at 9600 baud on the computer.
*/

#include <SoftwareSerial.h>

const uint8_t PIN_BRIDGE_RX = 10;                 // Arduino receives from CH340G TXD
const uint8_t PIN_BRIDGE_TX = 11;                 // Arduino sends to CH340G RXD
const unsigned long SEND_INTERVAL_MS = 2000;      // Time between messages
const unsigned int MAX_LINE_LENGTH = 64;          // Longest line kept in memory

SoftwareSerial bridge(PIN_BRIDGE_RX, PIN_BRIDGE_TX);  // Software serial port to the CH340G

unsigned long lastSend = 0;     // Time of the last message
unsigned long messageCount = 0; // Number of messages sent
String rxLine = "";             // Text received from the computer

void setup() {
  Serial.begin(9600);           // Normal Uno USB port, used for debugging
  bridge.begin(9600);           // Link to the CH340G at 9600 baud
  Serial.println(F("CH340G bridge test started"));
  bridge.println(F("CH340G link ready, 9600 baud"));
}

void loop() {
  // Send a numbered message at a fixed interval
  if (millis() - lastSend >= SEND_INTERVAL_MS) {
    lastSend = millis();
    messageCount++;
    bridge.print(F("Message "));
    bridge.print(messageCount);
    bridge.println(F(" from Arduino Uno"));
    Serial.print(F("Sent message "));
    Serial.print(messageCount);
    Serial.println(F(" to CH340G"));
  }

  // Read characters sent by the computer through the CH340G
  while (bridge.available() > 0) {
    char c = bridge.read();
    if (c == '\n' || c == '\r') {
      // End of line: echo it back with a prefix
      if (rxLine.length() > 0) {
        bridge.print(F("Received: "));
        bridge.println(rxLine);
        Serial.print(F("Text from CH340G: "));
        Serial.println(rxLine);
        rxLine = "";
      }
    } else if (rxLine.length() < MAX_LINE_LENGTH) {
      rxLine += c;              // Collect the characters of the line
    }
  }
}
The CH340G is a USB to UART converter that you use when you want to connect a microcontroller or a module with a serial interface to a computer's USB port. In this tutorial we use it as a USB-TTL adapter for an Arduino Uno board, so the platform is Arduino Uno. The board sends messages through pins 10 and 11 of a software serial port, and you read them on the computer through a second serial port, created by the CH340G.
The minimal circuit of the IC contains a 12 MHz crystal, two 33 pF capacitors, two 0.1 uF capacitors and a USB connector. Once you have them on a SOP-16 to DIP adapter or on your own circuit board, the IC behaves like any USB-TTL adapter.

How it works:
The computer speaks USB, while the microcontroller speaks UART TTL, that is two wires (TXD and RXD) that sit at a high logic level when idle. The CH340G receives the USB packets on the D+ and D- lines, converts them into serial bytes and sends them out on TXD. In the opposite direction, it converts the bytes received on RXD into USB packets. A virtual serial port appears on the computer.
The working clock is 12 MHz and comes from an external crystal connected between pins XI and XO, each with a 33 pF capacitor to ground. The serial speed is generated from this clock. If the oscillator does not start, the serial port does not appear on the computer.
A byte transmitted in 8N1 format has 10 bits: a start bit, 8 data bits and a stop bit. At 9600 baud the duration of one bit is 1 / 9600 = 104.2 us, so one byte takes 10 x 104.2 us = 1.04 ms and about 960 bytes can be transferred per second. At 115200 baud one bit lasts 8.68 us, and the throughput reaches about 11520 bytes per second.
The logic levels depend on the supply voltage. At 5 V the IC accepts a high level from 2.3 V upwards, and the output reaches at least VCC - 0.6 V at 2 mA, which matches the Arduino Uno. At 3.3 V it accepts a high level from 1.9 V upwards, and the outputs swing up to 3.3 V, suitable for the ESP32 or STM32.
Connection:
Power the IC at 5 V from the VBUS line of the USB connector, for example through a micro USB module with pins. At 5 V the outputs are 5 V, compatible with the Arduino Uno, so you do not need a level converter or pull-up resistors. The Arduino ground must be connected to the ground of the IC. The MODEM pins and the R232 pin are left unconnected.
| Product pin | Connect to | Role |
|---|---|---|
| 16 (VCC) | 5 V (VBUS) from the USB connector, plus 0.1 uF capacitor to ground | Power supply |
| 1 (GND) | GND from the USB connector and GND from the Arduino Uno | Common ground |
| 4 (V3) | 0.1 uF capacitor to ground | Internal decoupling of the 5 V supply |
| 5 (UD+) | D+ from the USB connector | USB data line |
| 6 (UD-) | D- from the USB connector | USB data line |
| 7 (XI) | 12 MHz crystal and 33 pF capacitor to ground | Oscillator input |
| 8 (XO) | 12 MHz crystal and 33 pF capacitor to ground | Oscillator output |
| 2 (TXD) | Arduino Uno pin 10 | Data from the computer to the Arduino (software RX) |
| 3 (RXD) | Arduino Uno pin 11 | Data from the Arduino to the computer (software TX) |
The Arduino Uno stays connected to the computer with its own USB cable, for programming and for debugging messages. The CH340G connects to a second USB port, and two different serial ports will appear on the computer.
Board and libraries:
In the Arduino IDE select Tools > Board the Arduino Uno board, from the Arduino AVR Boards package, which comes installed with the Arduino IDE. The program uses only the SoftwareSerial library, included in the Arduino IDE, so no library needs to be installed from the Library Manager. On the computer, install the VCP driver for CH340 if the operating system does not find it by itself.
The code:
The program sends a numbered message through the CH340G every 2 seconds, reads the lines of text coming from the computer and sends them back with a prefix.
/*
  CH340G USB to UART bridge test
  Board: Arduino Uno (Tools > Board > Arduino AVR Boards > Arduino Uno)
  Libraries: SoftwareSerial (included with Arduino IDE, nothing to install)
  Wiring:
    CH340G pin 2 (TXD) -> Arduino Uno pin 10 (software RX)
    CH340G pin 3 (RXD) -> Arduino Uno pin 11 (software TX)
    CH340G pin 1 (GND) -> Arduino Uno GND
  The CH340G circuit is powered at 5 V from its own USB connector.
  Open the serial port created by the CH340G at 9600 baud on the computer.
*/
#include <SoftwareSerial.h>
const uint8_t PIN_BRIDGE_RX = 10;                 // Arduino receives from CH340G TXD
const uint8_t PIN_BRIDGE_TX = 11;                 // Arduino sends to CH340G RXD
const unsigned long SEND_INTERVAL_MS = 2000;      // Time between messages
const unsigned int MAX_LINE_LENGTH = 64;          // Longest line kept in memory
SoftwareSerial bridge(PIN_BRIDGE_RX, PIN_BRIDGE_TX);  // Software serial port to the CH340G
unsigned long lastSend = 0;     // Time of the last message
unsigned long messageCount = 0; // Number of messages sent
String rxLine = "";             // Text received from the computer
void setup() {
  Serial.begin(9600);           // Normal Uno USB port, used for debugging
  bridge.begin(9600);           // Link to the CH340G at 9600 baud
  Serial.println(F("CH340G bridge test started"));
  bridge.println(F("CH340G link ready, 9600 baud"));
}
void loop() {
  // Send a numbered message at a fixed interval
  if (millis() - lastSend >= SEND_INTERVAL_MS) {
    lastSend = millis();
    messageCount++;
    bridge.print(F("Message "));
    bridge.print(messageCount);
    bridge.println(F(" from Arduino Uno"));
    Serial.print(F("Sent message "));
    Serial.print(messageCount);
    Serial.println(F(" to CH340G"));
  }
  // Read characters sent by the computer through the CH340G
  while (bridge.available() > 0) {
    char c = bridge.read();
    if (c == '\n' || c == '\r') {
      // End of line: echo it back with a prefix
      if (rxLine.length() > 0) {
        bridge.print(F("Received: "));
        bridge.println(rxLine);
        Serial.print(F("Text from CH340G: "));
        Serial.println(rxLine);
        rxLine = "";
      }
    } else if (rxLine.length() < MAX_LINE_LENGTH) {
      rxLine += c;              // Collect the characters of the line
    }
  }
}
How the code works:
At the beginning SoftwareSerial is included and the pins PIN_BRIDGE_RX (10) and PIN_BRIDGE_TX (11) are defined, then the bridge object is created, which implements a software serial port towards the CH340G. The variables lastSend, messageCount and rxLine keep track of the time of the last message, the number of the message and the received line of text.
In setup() the Serial port is started at 9600 baud for the usual link between the board and the computer, and the bridge port is started at 9600 baud for the CH340G, then a startup message is sent with bridge.println().
In loop() it is first checked with millis() whether SEND_INTERVAL_MS milliseconds have passed. If so, messageCount increases, and the message is sent through the bridge and announced on the Serial port. Then, as long as bridge.available() reports received bytes, each character is read with bridge.read() and added to rxLine. When a newline character is received, the text is sent back with the prefix Received, the line is displayed on Serial and rxLine is cleared. The length of the line is limited to 64 characters, so that the memory of the board does not fill up.
Result:
Open the Serial Monitor of the Arduino IDE on the port of the Arduino Uno board at 9600 baud. On a second port, the one created by the CH340G, open a terminal program such as PuTTY or Tera Term, also at 9600 baud. A numbered message appears in the terminal every 2 seconds. If you send a line of text from the terminal, ended with Enter, you get back the same line with the prefix Received, and the text received through the CH340G appears in the Serial Monitor of the board.
CH340G bridge test started
Sent message 1 to CH340G
Sent message 2 to CH340G
Text from CH340G: hello uno
Sent message 3 to CH340G
Sent message 4 to CH340G
Text from CH340G: test 123
Sent message 5 to CH340G
Sent message 6 to CH340G
Common problems:
The serial port does not appear on the computer. The usual cause is the oscillator that does not start or a wrong connection. Check the 12 MHz crystal between pins 7 and 8, the two 33 pF capacitors to ground and the power supply on pin 16. Also check that pin 4 has a 0.1 uF capacitor to ground.
Windows reports an unrecognized USB device. The possible cause is the D+ and D- lines swapped or resistors fitted in series on them. Connect pins 5 and 6 directly to D+ and D-, in the correct order, without resistors.
Strange characters appear. The speed of the program differs from that of the terminal, or the crystal does not have the correct frequency. Set the same speed, 9600 baud, in the program and in the terminal, and use a 12 MHz crystal with the recommended capacitors.
Nothing is received in either direction. Most often TXD and RXD are connected directly to the same type of pin, or the common ground is missing. The TXD of the IC must go to the RX of the board, and RXD to TX, and the Arduino ground must be connected to the ground of the IC.
It does not work at 3.3 V. In this mode pin V3 must be connected to the VCC pin and powered from 3.3 V. If it keeps a capacitor to ground, as at 5 V, the IC does not have the correct internal supply.
The IC heats up or fails. The supply exceeds the permitted range or the polarity is reversed. At 5 V the voltage must stay between 4.0 and 5.3 V, and the absolute maximum voltage on VCC is 6 V.
Limitations and tips:
The CH340G needs an external 12 MHz crystal, unlike variants that have an internal clock. The serial speed reaches 2 Mbps, but for high throughput, above 1 Mbps in one direction, a circuit with hardware flow control is recommended. On the Arduino Uno the SoftwareSerial library is reliable only at low speeds, and for high speeds the hardware serial port is used.
At a 3.3 V supply all connected circuits must work at a maximum of 3.3 V. For RS232, RS485 or RS422 interfaces, a level conversion circuit is added, for example the MAX3232 for RS232. With the same circuit you can build your own USB-TTL adapter for programming other boards, or a USB to RS232 cable.